Welcome to the woodworking world! Woodworking may be fun and gratifying whether you’re starting out or improving. It might be challenging for beginners to select appropriate materials and tools for their projects. This article will explain why salvaged wood is ideal for novice woodworking projects and what tools you’ll need.
Key Takeaways
- Reclaimed wood is cheaper, more durable, and better at handling mistakes than new wood, making it excellent for beginner woodworkers. It provides rustic projects a distinct look.
- Beginners need a tape measure, hand saw, chisels, hammer, screwdrivers, clamps, block plane, drill, sandpaper/block, and safety gear. These include woodworking essentials like measuring, cutting, shape, joining, smoothing, and safety.
- A rustic wall shelf, wooden picture frames, wood pallet coffee table, reclaimed wood headboard, little wooden planter boxes, wine rack, and planter hanger are starter crafts. These cover many issues and functions.
- Several beginner-friendly projects are explained step-by-step, including materials, tools, and construction. Follow these tips to simplify constructing.
- Always put safety first during woodworking. Protect yourself, use tools properly, investigate, and consult skilled woodworkers to avoid mishaps. Serious safety decreases danger.
Why use reclaimed wood for beginner woodworking projects?
Woodworkers of all skill levels frequently opt to work with reclaimed wood as their material of choice. Not only is it kind to the environment, but it also has a distinct personality and a rich history, all of which can provide an air of allure to the projects you undertake.
You are likely to make mistakes when you are just starting out, and the use of expensive new wood on your practice projects can be quite expensive. It is possible to find reclaimed wood in a wide variety of forms and sizes, making it an ideal material for practice and experimentation because it is typically less expensive.
Using recycled wood has a number of key advantages, one of which is that it has already been exposed to the elements, which means that it is less prone to bend or shrink. Because of its solidity, it is a perfect option for novice woodworkers who might not have the experience or understanding to prevent or remedy the problems that they encounter.
In conclusion, the utilisation of salvaged wood helps to preserve trees and decreases the amount of deforestation that occurs. To put it another way, it is an option that is beneficial to the environment.
Tools needed for beginner woodworking projects
1. Tape Measure: A tape measure is crucial for accurate measurements during woodworking projects. This tool will help ensure your cuts and dimensions are precise.
2. Hand Saw: A hand saw is essential for making basic cuts in wood. Choose a crosscut saw for cutting wood across the grain or a rip saw for cutting along the grain.
3. Chisels: Chisels are versatile tools that can be used for different purposes. They are great for creating mortises, shaping wood, and removing excess material.
4. Claw Hammer: A claw hammer is necessary for joining pieces of wood together. It has a flat face for driving in nails and a claw at the back for removing them.
5. Screwdrivers: Screwdrivers are needed for assembling various components and tightening screws in woodworking projects. Invest in both flathead and Phillips head screwdrivers for different types of screws.
6. Clamps: Clamps are used to hold workpieces together firmly during gluing or assembly. They help ensure that the pieces remain in place until the adhesive dries or the final joinery is completed.
7. Block Plane: A block plane is useful for smoothing rough surfaces or chamfering edges. It allows you to remove small amounts of wood quickly and accurately.
8. Drill: A drill will be necessary for making holes in wood. Start with a basic handheld drill or consider a cordless drill for more convenience.
9. Sandpaper and Sanding Block: Sandpaper and a sanding block are important for smoothing out surfaces and removing any rough edges or imperfections in your woodworking projects.
10. Safety Equipment: Lastly, always have safety equipment on hand. This includes safety goggles to protect your eyes from flying debris, ear protection, and dust masks to prevent inhalation of wood dust.
#1. Rustic Wall Shelf
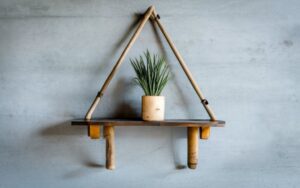
If you’re a beginner woodworker looking for a practical and stylish project to tackle, consider making a rustic wall shelf. This type of shelving unit is perfect for displaying decorative items, storing books, or organizing everyday essentials in a small space. Here is what you’ll need to create your own rustic wall shelf:
- Reclaimed wood (at least 1 inch thick, 10 to 12 inches wide, and 24 inches long)
- Saw (a miter or circular saw work well)
- Measuring tape
- Sandpaper or an electric sander
- Wood glue
- Screwdriver and screws (1-inch wood screws)
- Wall brackets
- Finishing materials (such as paint or a clear coat)
Rustic Wall Shelf Construction Steps
- Cut the reclaimed wood into three pieces: two shorter pieces approximately 8 inches long and one longer piece approximately 24 inches long.
- Sand all three pieces until they’re smooth and have a consistent finish.
- Attach the shorter pieces to either end of the longer piece using wood glue and screws. Make sure they’re flush.
- Cut two brackets that will hold the shelf to the wall from scrap wood or purchase pre-made brackets that fit the shelf’s measurements.
- Attach the wall brackets to the wall using screws.
- Attach the shelf to the brackets using screws.
- Finish the shelf with paints or stains that match your desired look.
That’s it! You’ve successfully created a rustic wall shelf using reclaimed wood. Not only is this a practical project but also an eco-friendly one that looks great in any home. Enjoy organizing and displaying your items on your newly made wall shelf!
#2. Wooden Picture Frames
Wooden Picture Frames Design and Materials
Are you looking for a simple yet stylish way to display your favorite photos? Consider making your own wooden picture frames. Here’s what you’ll need to get started:
- Wooden boards (at least 1 inch thick and 4 inches wide)
- Saw (a miter or circular saw work well)
- Measuring tape
- Sandpaper or an electric sander
- Wood glue
- Clamps
- Finishing materials (such as paint, stain, or a clear coat)
- Sawtooth picture hangers
Wooden Picture Frames Construction Steps
Follow these simple steps to create your own wooden picture frames:
- Measure and cut your wooden boards to your desired size (for example, a 5×7 inch frame would require two 5 inch boards and two 7 inch boards).
- Sand all sides of your boards until they’re smooth and have a consistent finish.
- Apply a thin layer of wood glue to the ends of one of your shorter boards.
- Attach the glued board to one of your longer boards using clamps to hold them in place until the glue dries. Repeat for the other short and long boards.
- Once the glue is dry, remove the clamps and use a sawtooth picture hanger to attach to the back of your frame.
- Finish the frame with paint, stain, or a clear coat of your choice.
- Insert your favorite photo and enjoy your new handmade wooden picture frame!
Creating your own wooden picture frames is an easy and affordable way to add a personal touch to your home decor. Plus, you can customize them with different finishes or paint colors to match your existing color scheme. Go ahead and give it a try – your friends and family will be impressed with your new DIY skills!
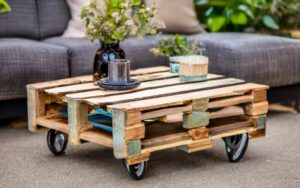
#3. Wood Pallet Coffee Table
Wood Pallet Coffee Table Design and Materials
Looking for an affordable way to create a unique and rustic addition to your living room? Why not try making your own coffee table out of wood pallets? Here’s what you’ll need to get started:
- Wood pallets (at least two of the same size)
- Saw (a circular saw or jigsaw work well)
- Drill
- Screws and nails
- Sanding block or electric sander
- Stain or paint (optional)
- Glass top (optional)
Wood Pallet Coffee Table Construction Steps
Follow these simple steps to create your own wood pallet coffee table:
- Begin by removing the planks from one of the pallets using a saw or pry bar. These will become the top of the table.
- Use the saw to cut the second pallet in half. These will become the legs of the table.
- Attach the legs to the table top using screws and nails. Be sure to securely fasten the legs to the table top.
- Sand the rough edges and surfaces to create a smooth finish for the table.
- Optionally, add a coat of paint or stain to the table to give it a finished look.
- For a polished touch, top the table with a glass surface.
Creating your own wood pallet coffee table is an easy and affordable way to add a rustic touch to your living spaces. With only a few materials and a little elbow grease, you’ll have a unique furniture piece that you can be proud of. So go ahead, give it a try – your friends and family will be amazed by your DIY skills!
#4. Reclaimed Wood Headboard

Reclaimed Wood Headboard Design and Materials
Looking for a way to add a unique and rustic touch to your bedroom decor? A reclaimed wood headboard could be just the thing! Here’s what you’ll need to get started:
- Reclaimed wood planks
- Saw (a circular saw or jigsaw work well)
- Drill
- Screws and nails
- Sanding block or electric sander
- Stain or paint (optional)
Reclaimed Wood Headboard Construction Steps
Follow these simple steps to create your own reclaimed wood headboard:
- Begin by measuring the width of your bed and selecting reclaimed wood planks to match.
- Use the saw to cut the planks to the desired height of your headboard.
- Arrange the planks in a pattern that you like and attach them together using screws and nails.
- Sand the rough edges and surfaces to create a smooth finish for the headboard.
- Optionally, add a coat of paint or stain to the headboard to give it a finished look.
- Attach the headboard to the wall using screws and wall anchors.
Creating your own reclaimed wood headboard is a fun and rewarding DIY project that can transform the look of your bedroom. With a bit of creativity and a few simple materials, you can create a unique and personalized piece of furniture that shows off your style and skills. So why not give it a try and see what you can create?
#5. Small Wooden Planter Boxes

Small Wooden Planter Boxes Design and Materials
Looking for a fun and easy way to add some green to your home decor? Why not try making your own small wooden planter boxes! Here’s what you’ll need to get started:
- Wooden planks
- Saw
- Drill
- Screws
- Landscape fabric or mesh screen
- Soil
- Plants
For a rustic look, choose reclaimed wood planks or pallet boards. If you don’t have access to these materials, you can use new wood planks and stain them to give them a weathered look. For the soil, make sure to choose a quality potting mix that will provide the proper nutrients for your plants.
Small Wooden Planter Boxes Construction Steps
Follow these simple steps to create your own small wooden planter boxes:
- Begin by cutting your wooden planks to the desired length and width of your planter box.
- Use the drill and screws to attach the planks together to form the box.
- Line the bottom of the planter box with landscape fabric or mesh screen to prevent soil from escaping.
- Fill the planter box with the potting mix, leaving about an inch of space at the top.
- Add your plants, making sure to space them out evenly.
- Water the plants and enjoy your new small wooden planter box!
Creating your own small wooden planter boxes is a fantastic DIY project that can brighten up any room or outdoor space. Whether you’re an experienced crafter or just starting out, this project is easy and fun to do. So why not give it a try and see what amazing creations you can come up with!
#6. Wine Rack

Wine Rack Design and Materials
If you’re a wine lover and looking for a way to display your collection, why not try making your own wine rack? Here’s what you’ll need to get started:
- Wooden planks
- Saw
- Drill
- Screws
- Stain or paint
- Cork or mesh tubing
You should select wooden planks that are strong enough to support the weight of a number of wine bottles collectively. You can achieve a more rustic appearance by using salvaged wood, or you can purchase fresh wood and stain it to fit the decor in your home.
This can be accomplished by using cork or mesh tubing as separators, which will prevent your wine bottles from rolling around. Prior to beginning the process of cutting the wood planks, it is important to make a decision on the dimensions and appearance of your wine rack.
Wine Rack Construction Steps
Follow these simple steps to create your own wine rack:
- Cut your wooden planks to the desired length and width of your wine rack.
- Sand the edges to prevent splinters.
- Arrange the planks in the desired shape and attach them using screws and a drill.
- Stain or paint the wine rack, or leave it natural for a more rustic look.
- Cut the corks or mesh tubing to the appropriate size and insert them between the planks to keep your wine bottles from moving around.
- Hang your new wine rack on the wall and fill it with your favorite bottles!
Creating your own wine rack is a simple and rewarding DIY project that can add a touch of sophistication to your home decor. By customizing the look and size, you can create a wine rack that perfectly fits your space and style. So why not give it a try and enjoy your next glass of wine in style!
#7. Planter Hanger
Planter Hanger Design and Materials
If you’re looking for a way to add some greenery to your home decor, why not try making a planter hanger? Here’s what you’ll need to get started:
- Macrame cord or rope
- Wooden ring
- Pot or planter
- S-hook
- Scissors
Choose a pot or planter that will fit snugly into your hanger, and select a macrame cord that is strong enough to hold the weight of the pot when filled with soil and plants. A wooden ring will serve as the top of your hanger, and an S-hook will allow you to hang it from a ceiling or wall.
Planter Hanger Construction Steps
Follow these simple steps to create your own planter hanger:
- Cut 4 pieces of macrame cord to the desired length (about 4 times the length of your pot or planter).
- Fold each piece of cord in half and tie a knot at the folded end to create a loop.
- Attach the four loops to the wooden ring using simple knots.
- Divide the cords into pairs and tie a knot a few inches below the wooden ring to create a cradle for your pot or planter.
- Repeat step 4 for each pair of cords.
- Gather all cords together and tie another knot below the bottom of the planter to create a secure hanger.
- Trim the excess cord and hang your new planter hanger using an S-hook.
Creating your own planter hanger is an easy and fun DIY project that can bring some life and color into your home. By selecting a pot or planter and macrame cord that match your decor, you can create a unique and personalized piece. So why not give it a try and enjoy your new green friend!
Conclusion
To summarize key points, salvaged wood is an ideal material for beginner DIY woodworking projects. Compared to new wood, it is cheaper, more durable, and better withstands mistakes. Beginners should equip themselves with basic tools for measuring, cutting, joining, and safehandling wood.
Example starter projects like rustic shelves, picture frames, and planter boxes allow for practice. Following step-by-step guides simplifies the building process.
And above all, safety should remain the top concern through use of protective gear and caution. With the right preparation, beginners can discover the rewards of woodworking craftsmanship.
Frequently asked questions
Q1: What are some good woods for beginner projects?
Pine, poplar, oak, cedar and redwood are all good starter woods that are affordable, readily available, easy to work with and forgive mistakes.
Q2: What safety practices should beginner woodworkers follow?
Always wear safety goggles, use sharp tools carefully, operating power tools properly after reading manuals, clean up sawdust regularly, use equipment guards, and check wood for defects before starting.
Q3: What finishes work well for basic wood projects?
Beginner-friendly finishes include beeswax, tung oil, Danish oil, watco, spar urethane, wipe-on polyurethane, paint and stains. They are easy to apply and provide good protection.
Q4: Where can someone buy reclaimed wood for projects?
Check local resources like demolition companies, salvage yards, community reuse stores, online retailers, eBay and Craigslist listings. Also network with contractors who may have leftover materials from jobs.
Q5: How much woodworking experience is needed to sell projects?
While specific experience levels vary, confidence handling a range of tools and techniques as well as knowledge of wood characteristics is required. More complex skills allow for selling at higher price points. Quality, good documentation and marketing also help products sell.

I’m James Brown, the founder and editor of DIYINUSE.COM. I have over 15 years of hands-on woodworking and DIY experience that I share through tips and project inspiration on my website. When I’m not working on home improvement projects or creating content for the site, I enjoy spending time outdoors hiking and fishing. I’m always looking to expand my creativity and DIY skills by learning new techniques.