![DIY Modern Raised Planter Box [step-by-step]](https://diyinuse.com/wp-content/uploads/2023/11/GOLF-GPS-44.png)
Hey, I am James Brown, and welcome to my new article, where I will tell you the how to make DIY Morden Raised Planter Box.
Integrating nature into our living places is becoming more trendy in current times. Adding plants to our houses not only enhances attractiveness but also creates a sense of calm and quiet. To add greenery to your room, consider making a DIY modern raised planter box.
DIY raised planter boxes let you customize size and style to suit your needs. This idea can be customized for any size balcony or backyard.
This step-by-step instruction explains how to build a modern elevated planter box with wood and steel legs. A beginner woodworker may make a stunning planter box to improve their outdoor or interior area with some basic equipment and supplies.
Grab your tools and let’s build a beautiful, modern elevated planter box for your favourite plants.
Step 1: Tools and Materials
Before you start building your DIY modern raised planter box, it’s important to gather all the necessary tools and materials. Here’s a list of what you’ll need:
- Wood: Choose a type of wood that is suitable for outdoor use, such as cedar or redwood. You’ll need boards in various lengths and widths, depending on the size of your planter box.
- Screws: Opt for exterior rated screws to ensure they can withstand the elements. You’ll need different sizes depending on the different parts of the project.
- Drill: A cordless drill will be your best friend throughout this project. Make sure you have a set of drill bits that are compatible with the screws you’re using.
- Miter Saw: This tool will come in handy for cutting the wood to the correct lengths and angles. A miter saw with a laser guide will help ensure accuracy.
- Sander: To achieve a smooth and polished finish, you’ll need a sander. A random orbital sander will work well for this project.
- Measuring Tape: Accurate measurements are key to a successful planter box. Grab a measuring tape to ensure your cuts are precise.
- Safety Equipment: Don’t forget safety goggles to protect your eyes and gloves to keep your hands safe while working with wood and power tools.
Once you have gathered all these tools and materials, you’re ready to move on to the next step: material preparation.
Step 2: Material Prep
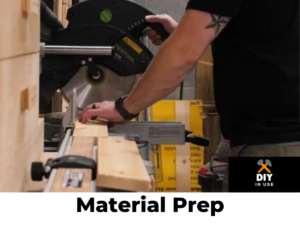
Once you have gathered all the necessary tools and materials, it’s time to move on to the material preparation stage of building your DIY modern raised planter box. This step is crucial for ensuring a smooth and successful construction process. Here’s what you need to do:
- Break down the Cedar boards: Start by breaking down the Cedar boards into their final lengths. This will involve using a miter saw to make accurate cuts. Remember to follow the measurements specified in your plan and take your time to achieve precise cuts.
- Sand the boards: After cutting the boards, it’s important to sand them to achieve a smooth and polished finish. You can use a random orbital sander for this task, ensuring that all edges and surfaces are smooth to the touch.
- Sort and organize: Once the boards are cut and sanded, sort and organize them based on their sizes and lengths. This will make it easier for you to assemble the panels later on.
Taking the time to properly prepare your materials will set you up for success as you move forward with constructing your modern raised planter box. So, be thorough and meticulous in this step to ensure the best possible results.
Step 3: Assembling Panels
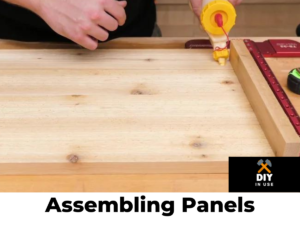
After material preparation, assemble the DIY modern raised planter box panels. This phase is vital to the planter box’s structure and stability. What to do:
Gather pre-cut and sanded cedar boards for the panels first. This is easy if you’ve sorted them by size and length. On your work surface, arrange the boards with the right number for each panel.
Using brad nails, fasten 1x2s to the cedar boards’ edges to frame each panel. They should be secured equally along the boards. The panels become stronger and more stable.
Screw the joints of the 1x2s. This will strengthen the panels and prevent separation. Repeat for all panels, including long side panels.
By attaching the panels, your modern raised planter box is almost finished. To give your plants a solid foundation, take your time and secure each joint.
Step 4: Long Panels

After assembling the DIY modern raised planter box panels, start the long side panels.
As before, put out the pre-cut and sanded cedar boards on your work table. Check the board count for each panel.
Attach 1x2s to the cedar boards’ edges using brad nails to frame each long panel. They should be secured equally along the boards. This strengthens and stabilises the panels.
Screws strengthen joints and prevent panels from falling apart. Repeat this for all long planter box side panels.
Your DIY modern raised planter box is almost finished when the long panels are finished. Panels give structure and stability for plants. Take your time and secure each joint to build a solid foundation.
Step 5: Joining Panels Together
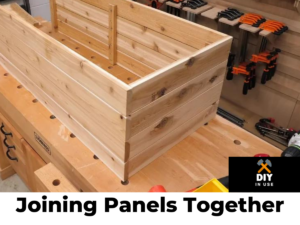
After assembling the panels for your DIY modern raised planter box, join them. Creating a solid, long-lasting planter box requires this step.
Lay your constructed panels on a flat work surface to begin. Make sure each planter box side has enough panels.
Screw the corners of the panels together. The screws should be placed 1 ⅛” from the planter box corner to connect with the 1×2 from the other panel. This secures and tightens the connection, preventing panel separation.
Flip the planter box and put extra screws along the top after closing the corners. The joints will be strengthened and more stable.
Your DIY modern raised planter box is almost done when the panels are joined. Take your time and secure each joint to provide your plants a firm foundation.
Once the panels are properly attached, you may add the planter box bottom.
Step 6: Adding the Bottom
The bottom of the planter box goes on after the outside walls are properly linked. A base for the soil and plants and structural support for the planter box are essential.
Start by flipping the planter box so the open side is up. Place the bottom panel on top of the box, centred and aligned with the walls. Adjust slowly to get a good fit.
Next, screw the bottom panel to the planter box walls. Install screws evenly around the edges, 1 inch from the corners. This secures the bottom and prevents moving.
After installing all screws, gently press on the bottom panel to ensure stability. It should feel solidly linked to the walls.
A functional and elegant home for your plants is one step closer with a DIY modern raised planter box bottom. Trimming the planter box’s top edges is the next step.
Step 7: Adding Trim
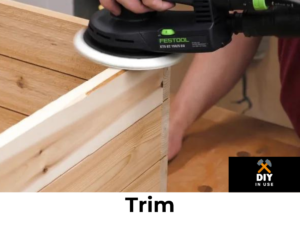
It is time to add some finishing touches to your planter box now that the bottom panel has been successfully fastened to the walls of the planter box. During this stage of the process, you will give the planter box a finished and expertly crafted appearance by adding trim to the top edges of the box.
Before installing the trim, you should first make sure that all of the corners have been sanded flush. This will guarantee that the surface is smooth and allow the trim to sit in the correct position. Next, you will need to determine the length of your planter box so that you can accurately cut the trim pieces. It is always a good idea to cut them somewhat longer, and then trim them to the final size based on the actual dimensions. This will ensure that they fit properly.
When you have the trim pieces cut to the appropriate length, you can connect them to the top edges of the planter box by using a combination of glue and 1 12″ brad nails. The uprights made of 1×2 lumber offer an ideal location to hammer in the nails, which in turn guarantees a sturdy connection.
The addition of trim to a planter box not only contributes a decorative element but also serves to protect the edges of the box and gives the box a more finished appearance overall. Now that you’ve finished this stage, your do-it-yourself modern raised planter box is beginning to take shape and is looking even more amazing as a result.
The next step is to line the planter with something to prevent water damage to the wood and ensuring that there is adequate drainage.
Step 8: Lining the Planter
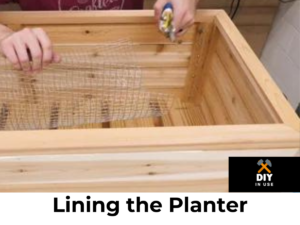
Now that your planter box is taking shape and looking more polished with the addition of trim, it’s time to move on to the next step: lining the planter.
Lining the planter serves two important purposes. First, it ensures proper drainage for your plants. Without proper drainage, the excess water can pool at the bottom and lead to root rot and other issues. By creating a lining, you can allow the water to drain out while keeping the soil in place.
Secondly, a lining helps protect the wood from water damage. When exposed to constant moisture, wood can warp, rot, and deteriorate over time. By lining the planter, you create a barrier that prevents direct contact between the soil and the wood, prolonging the life of your planter box.
To line the planter, you can use a variety of materials such as landscape fabric, geotextile fabric, or even a plastic liner. Cut the liner to the dimensions of your planter box, making sure to leave a few inches of overhang on all sides. Place the liner inside the box, pressing it against the walls and bottom, and folding the excess over the top edges.
Once the liner is in place, you can secure it using staples or adhesive, ensuring it stays in place even when you add soil and water to the planter. Double-check that the corners and edges are properly sealed to prevent any leaks.
With the planter lined, you have taken another important step towards ensuring the success and longevity of your DIY modern raised planter box. The lining not only provides the necessary drainage and protection but also adds a layer of professionalism to your project. It’s time to move on to the next step and add the steel legs to elevate your planter box to new heights.
Step 9: Steel Legs
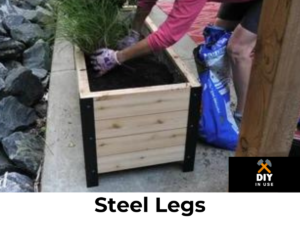
With the previous steps completed, it’s time to elevate your DIY modern raised planter box to new heights by adding steel legs. The addition of steel legs not only enhances the overall aesthetic of the planter but also provides stability and durability.
To begin, measure and cut the steel legs to the desired length. You can opt for pre-made steel legs or make your own using angle irons or square tubing. Make sure to account for the desired height of your planter when determining the length of the legs.
Once the legs are cut, smooth out any rough edges using a grinder or sandpaper to avoid any potential injuries. You can also round over the corners to add a sleek and modern touch.
With the legs prepared, it’s time to attach them to the planter box. Place the legs at the corners of the box and mark the holes for screws. Pre-drill the holes and then secure the legs using screws or bolts, ensuring a sturdy connection.
Once all the legs are attached, give the planter box a gentle shake to ensure it is stable. Adjust the legs as needed to achieve a level and balanced planter.
The addition of steel legs not only elevates the aesthetics of your DIY modern raised planter box but also provides an extra level of sturdiness and durability. It’s time to move on to the next step and continue building your planter box.
Step 10: Legs Continued
With the legs attached to the planter box, it’s time to continue building and adding the final touches. One important aspect to consider is ensuring the stability and durability of the legs.
To further enhance the strength of the connection between the legs and the planter box, you can reinforce the attachment points. One option is to use metal brackets or corner braces, which will provide additional support and prevent any wobbling or movement of the legs.
Another way to reinforce the legs is by adding cross braces between them. These braces can be made from the same steel material as the legs and should be placed diagonally across the corners of the planter box. This will create a more rigid structure and improve the overall stability of the planter.
Once the reinforcement is in place, it’s time to give the planter box a test run. Place some weight inside the box, such as soil or plants, and check for any signs of instability or movement. If everything feels sturdy and secure, then congratulations! You have successfully completed the legs and reinforced them for added strength.
Now that the legs are complete, you’re one step closer to finishing your DIY modern raised planter box. Stay tuned for the next step, where we will cover the final touches and wrap up the construction process.
Step 11: Finishing Up
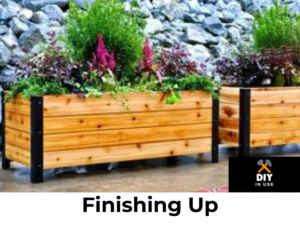
Congratulations! Your DIY modern raised planter box is almost done. Now apply the finishing touches and check everything.
Check the entire planter box first. Check for loose screws and nails and tighten. Make sure joints are secure and gaps are hidden. Smooth any rough edges or splinters with sanding.
You can finish the wood after you’re satisfied with the structure. This will improve its appearance and lifetime. A clear outdoor sealer or wood stain in your desired colour works. Follow the manufacturer’s directions to evenly coat all surfaces with finish.
After the finish dries, fill your planter box with dirt and plant your favourite flowers or herbs. Consider sunlight and watering needs while choosing plants for raised beds. Arrange the plants for beauty and growth.
That’s it! You finished your DIY trendy raised planter box. Enjoy your garden or outdoor space after you finished your job.
Final Words
Building a modern raised planter box is a fun carpentry project that adds flair and use to your landscape. Follow this guide’s step-by-step directions to make a planter box that matches your needs.
Planning and precise measurements are essential to project success. Get all the supplies and tools before starting. Don’t be scared to ask experienced DIYers or gardeners for advice.
Check and tighten loose joints and screws after building your planter box. Sand rough edges and polish the wood to improve its beauty and preserve it from the elements.
Finish by filling your planter box with dirt and gently placing your favourite plants. Enjoy producing your own flowers or herbs and adding a distinctive touch to your outdoor environment.
Happy gardening and DIYing!

I’m James Brown, the founder and editor of DIYINUSE.COM. I have over 15 years of hands-on woodworking and DIY experience that I share through tips and project inspiration on my website. When I’m not working on home improvement projects or creating content for the site, I enjoy spending time outdoors hiking and fishing. I’m always looking to expand my creativity and DIY skills by learning new techniques.