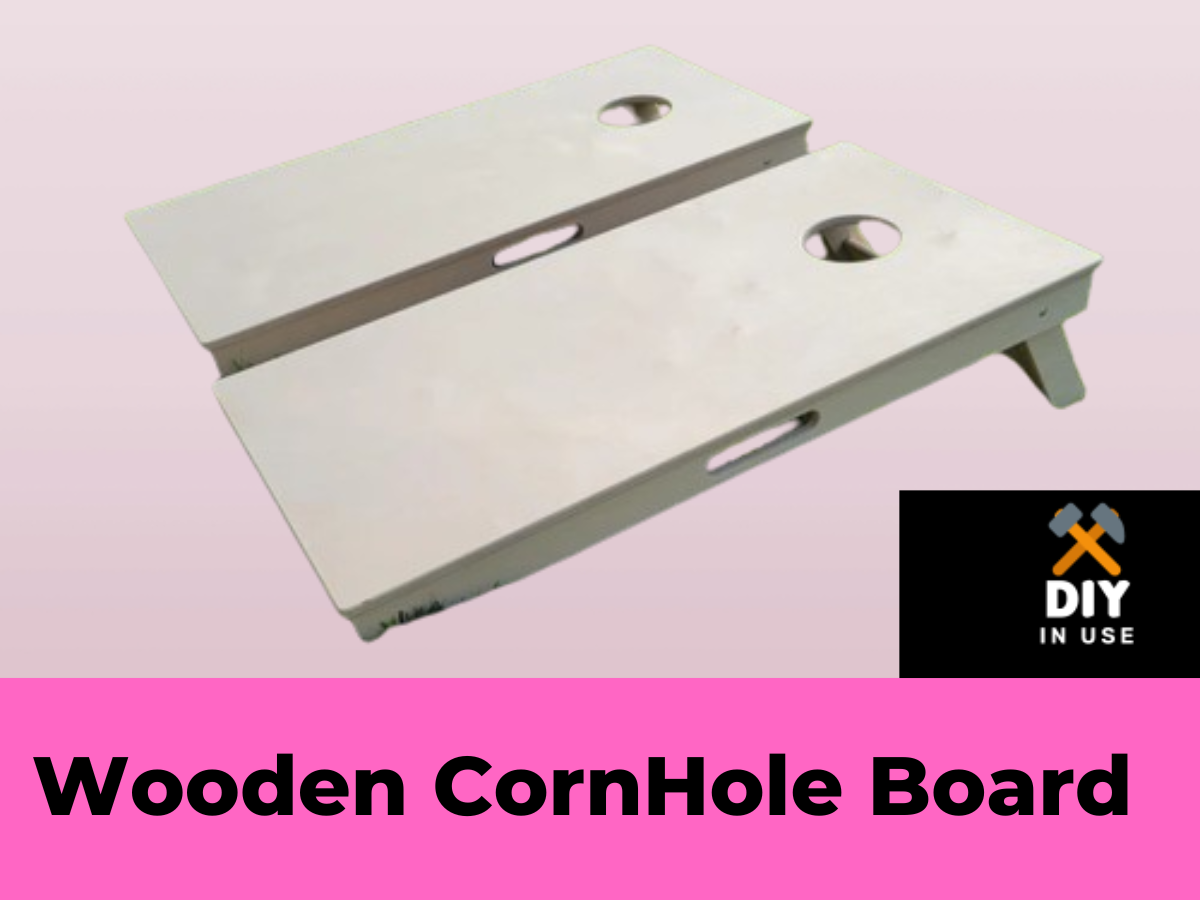
Hey, I am James Brown, and welcome to my new article, where I will tell you how to make wooden cornhole board.
If you enjoy spending time outdoors with family and friends, then cornhole is a game that you must try. Cornhole is a classic American backyard game that involves tossing bean bags onto a wooden board with a hole in it. It’s a fun and competitive game that brings people together.
In this article, we will guide you through the process of making your own cornhole board. Not only is it a great project for woodworking enthusiasts, but it also gives you the opportunity to customize your board according to your preferences.
You don’t have to spend a fortune on buying a cornhole board when you can easily build one yourself. Plus, the satisfaction of playing on a board that you created with your own hands is truly rewarding.
Before we dive into the step-by-step process, let’s talk about the supplies you’ll need to complete this project. Make sure to gather all the necessary materials and tools before you begin.
So, if you’re ready to embark on a woodworking adventure and have endless hours of fun playing cornhole, let’s get started!
Supplies Needed
Before you can start building your own cornhole board, you will need to assemble the necessary supplies and tools. Here’s a list of what you’ll need:
- 4 2x4x96″ boards: These will be used to create the frame of the cornhole board.
- 1 48x96x1/2″ plywood board: This will be used as the surface of the cornhole board.
- Deck screws: You’ll need these to secure the boards together.
- Drill: This will be used to drill holes and attach the boards.
- Jigsaw: You’ll need this to cut the hole in the plywood surface.
- Paint: Choose any color you like to personalize your cornhole board.
- 4 4″ bolts with nuts and washers: These will be used to attach the legs to the frame.
- Bean Bags: You’ll need a set of bean bags to play the game.
Make sure to gather all of these supplies before you begin the building process. Having everything on hand will make the process smoother and more efficient.
Once you have gathered all the supplies, you’re ready to move on to the next step: designing the cornhole board using Fusion 360.
Step 1: Fusion 360 Design
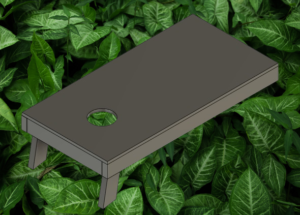
Before diving into the construction process, it’s essential to have a clear plan and design for your cornhole board. This is where Fusion 360, a powerful designing software, comes into play. By using Fusion 360, you can visualize your board and make precise measurements, ensuring that everything fits together seamlessly.
To start, open Fusion 360 and create a new design project. Set the dimensions of your cornhole board to the standard size of 12 inches tall, 4 feet wide, and 8 feet long. This will give you an accurate representation of the final product.
Next, start modeling the individual components of the board. Begin with the frame, using the measurements of the 2x4x96″ boards. Create a rectangular shape and extrude it to the desired thickness. Repeat this step for all four sides of the frame.
Then, move on to the surface of the board. Use the dimensions of the 48x96x1/2″ plywood board and create a rectangular shape that covers the entire frame. Extrude this shape to the desired thickness to complete the surface.
At this stage, you can also add any additional design elements or customizations to make your cornhole board unique. This could include rounded edges, decorative patterns, or even your brand logo.
Once you are satisfied with the design, you can export the file as a 2D drawing or a 3D model to guide you in the construction process. Having a visual representation of your board will help you stay organized and ensure that you build with accuracy.
By using Fusion 360 to design your cornhole board, you can save time and avoid costly mistakes. It allows you to bring your vision to life before even picking up a tool, giving you the confidence to proceed with the building process.
Step 2: Start Building
Now that you have your design ready, it’s time to start building your cornhole board! Before you begin, gather all the necessary materials and tools for the construction process. Here’s a list of what you’ll need:
- 4 pieces of 2x4x96″ boards
- 1 sheet of 48x96x1/2″ plywood
- Deck screws
- Drill
- Jigsaw
- Paint (in any color you desire)
- 4 bolts with nuts and washers (each measuring 4″)
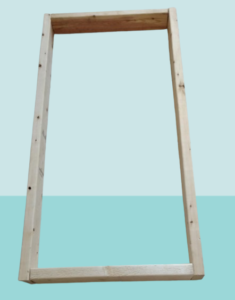
Once you have everything ready, it’s time to get started. Begin by cutting the 2×4 boards to the desired lengths according to your design measurements. These boards will form the frame of your cornhole board. Use a jigsaw or a saw to make precise cuts.
Next, assemble the frame by attaching the boards together using deck screws. Make sure the corners are square and secure the boards tightly to ensure stability.
After the frame is complete, it’s time to attach the plywood surface. Cut the plywood sheet to match the dimensions of your design. Place the plywood on top of the frame and secure it using deck screws. Make sure the surface is smooth and level.
Once the construction is complete, it’s time to add some personality to your cornhole board. Use paint to decorate the boards according to your preferences. You can choose to paint it in a solid color or get creative with designs and patterns.
Congratulations! You have now successfully completed the second step of building your cornhole board. In the next step, we will guide you through making the top of the board. So, stay tuned for the next installment of our guide.
Step 3: Make the Top

Now that you have completed the frame and attached the plywood surface, it’s time to move on to the next step: making the top of your cornhole board. This is where you will create the surface that the bean bags will be thrown onto.
To make the top, you will need to gather the following materials:
- 1/2-inch thick plywood sheet
- Measuring tape
- Pencil
- Jigsaw
- Sandpaper
First, measure and mark the dimensions for the top of your cornhole board on the plywood sheet. The standard dimensions for a cornhole board are 24 inches wide by 48 inches long. Use a measuring tape and pencil to ensure accurate markings.
Next, use a jigsaw to carefully cut along the marked lines. Take your time and make smooth, precise cuts to ensure the best results. Once the cuts are complete, use sandpaper to smooth out any rough edges or splinters.
After sanding, the top of your cornhole board is ready. Place it on top of the frame and secure it using deck screws. Make sure the surface is level and secure, as this is essential for optimal gameplay.
Congratulations! You have now successfully completed the third step of building your cornhole board. In the next step, we will guide you through constructing the legs. So, stay tuned for the next installment of our guide.
Step 4: The Legs
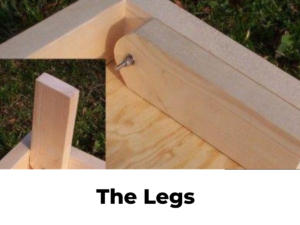
Once you have completed the top of your cornhole board, it’s time to move onto the next crucial step: constructing the legs. The legs are what will hold the board upright and ensure stability during gameplay. Here’s a step-by-step guide on how to make the legs:
- You will need four 2x4x96″ boards. These will serve as the main components for your legs.
- Start by measuring and marking the desired length for your legs. A standard length for cornhole board legs is around 12 inches. Use a saw to cut the boards to the appropriate length.
- Attach the legs to the frame: Place the cut boards vertically on each corner of the frame. Make sure they are flush with the sides and secure them using deck screws. It’s recommended to pre-drill holes before inserting the screws to prevent splitting.
- Reinforce the legs: To ensure stability, you can add diagonal braces between the legs. Cut two additional pieces of the 2x4x96″ board at a 45-degree angle and attach them diagonally between the legs using deck screws.
- Test the stability: Once all the legs and braces are attached, test the stability of your cornhole board. Shake it gently to ensure there is no wobbling or loosening.
Congratulations! You have successfully completed the fourth step of building your cornhole board. Now, with the legs firmly in place, your board is ready for the next steps of painting and finishing. In our next installment, we will guide you through the process of painting your cornhole board to give it a polished and professional look. Stay tuned!
Step 5: Paint
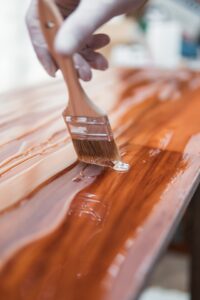
Now that you have the legs securely attached to your cornhole board, it’s time to move on to the next exciting step: painting! Painting not only adds a pop of color to your board but also protects it from weather elements and gives it a polished and professional look. Here’s a step-by-step guide on how to paint your cornhole board:
- Prepare the surface: Start by cleaning the surface of your board to remove any dust or debris. You can use a damp cloth or sponge to wipe it down and let it dry completely.
- Choose your paint: Select a paint color that suits your preference and matches the theme or design you have in mind for your cornhole board. Acrylic or latex paint is recommended for this project as they are durable and weather-resistant.
- Apply primer: Before painting, apply a coat of primer to the entire surface of the board. This will help the paint adhere better and provide a smooth and even finish. Let the primer dry according to the manufacturer’s instructions.
- Paint the base coat: Once the primer is dry, start painting the base coat using a paintbrush or roller. Apply thin and even layers, allowing each coat to dry before applying the next. This helps prevent drips and ensures a smooth finish.
- Add designs or logos: If desired, you can get creative and add designs, logos, or patterns to your cornhole board. Use stencils, tape, or freehand techniques to create your desired look. Allow the paint to dry completely before moving on.
- Apply a protective finish: To protect the paint and ensure durability, apply a clear polyurethane or acrylic sealer as a final coat. This will also give your board a glossy finish. Let the sealer dry completely before using the board.
And there you have it! Your cornhole board is now painted and ready for some outdoor fun. The painting process allows you to personalize your board and make it truly unique. So, gather your favorite paint colors, unleash your creativity, and make your cornhole board a standout piece at your next backyard gathering.
Step 6: Make the Other
After you have finished one of the cornhole boards, to play, you need another! You can have fun making, and painting, the other one.
Now that you have completed the first cornhole board, it’s time to move on to the next exciting step: making the other board. This step requires some woodworking skills and materials, but with a little patience and effort, you can create a second board that matches the first one perfectly.
To begin, gather the necessary supplies, including 4 pieces of 2x4x96″ wood, a 48x96x1/2″ plywood board, deck screws, a drill, a jigsaw, paint in your desired color, and 4 bolts with nuts and washers.
Start by cutting the 2×4″ wood into the appropriate lengths for the frame of the board. Use the drill to attach the pieces together, forming a sturdy frame. Next, cut the plywood into the dimensions of the playing surface and attach it to the frame using deck screws.
Once the basic structure is complete, you can move on to painting the board. Select a paint color that matches the first board or choose a complementary color to add some visual interest. Apply thin and even coats of paint, allowing each coat to dry before applying the next.
After the paint has dried, add any desired designs or patterns to make the board unique. You can use stencils, tape, or freehand techniques to create your desired look.
Once everything is dry, your second cornhole board is ready for some outdoor fun! Now you have a matching set of boards for a complete game of cornhole. Get ready to enjoy hours of entertainment with family and friends.
Final Words
Congratulations! You have successfully completed all the steps to make your own cornhole board. From gathering materials and tools to constructing and painting, you have put in the time and effort to create a custom, high-quality board.
By following this guide, you have not only saved money compared to buying a pre-made board, but you have also added a personal touch and made it uniquely yours. Whether you’re planning a backyard party or a fun day at the park, your cornhole board is sure to be a hit.
Remember, the process of making a cornhole board can be a rewarding and enjoyable project for both beginners and experienced woodworkers. So, gather your tools, unleash your creativity, and have fun making memories with your custom cornhole board. Happy playing!
Final Words
Congratulations! The cornhole board-making process is complete. You spent time making a personalised, high-quality board from supplies and tools to building and painting.
By following this guide, you saved money and made your board distinctive by adding a personal touch. Your cornhole board will be a success at a backyard party or park day.
For beginners and experts, constructing a cornhole board can be fun and rewarding. So grab your tools, get creative, and enjoy generating memories with your unique cornhole board. Enjoy playing!
But the road continues. With your cornhole boards, assemble your friends and family for hours of fun and laughing. Hold tournaments, friendly competitions, or just relax with a backyard game.
Cornhole is great for bonding and making memories. Cornhole is fun for all ages and skill levels, whether you’re playing with kids, friends, or family.
Show off your DIY skills by showing your own cornhole boards. Let the games begin and may every toss bring joy, fellowship, and friendly competition.
The important things are the friendships, laughing, and pure happiness you share, not the score. Grab your bean bags, aim for the hole, and have fun!
Finally, constructing a cornhole board is satisfying. It lets you express your ideas, demonstrate your woodworking talents, and design a game that matches your personality.
Waiting for what? Start your cornhole board project today and enjoy outdoor games with your own handcrafted boards. Happy building and playing!

I’m James Brown, the founder and editor of DIYINUSE.COM. I have over 15 years of hands-on woodworking and DIY experience that I share through tips and project inspiration on my website. When I’m not working on home improvement projects or creating content for the site, I enjoy spending time outdoors hiking and fishing. I’m always looking to expand my creativity and DIY skills by learning new techniques.