Hey, I am James Brown and welcome to my new article, where I will tell you what you can do at the weekend to improve your Home.
It’s important to make your home oasis perfect because home is where the heart is. Home upgrades increase property value and are satisfying to complete. There are several weekend DIY home improvement tasks for beginners.
Importance of DIY projects for Home Improvement
DIY home repair tasks might be intimidating for beginners. That shouldn’t scare you. Start small, then increase your projects as you acquire confidence. Remember that even simple adjustments can improve your home’s attractiveness.
Start with DIY tasks that improve your home’s appearance and functionality. You may add storage to declutter, paint old furniture, or install new light fixtures to improve the ambiance. Remember, planning and preparation are vital to DIY success.
Benefits of Tackling Beginner Projects in a Weekend
Weekend DIY projects have several perks. These tasks are a cheap way to improve your home without employing pros. Second, they provide great opportunities for beginners to master new skills. Finally, weekend DIY projects are rewarding. Witnessing your home’s physical changes is always satisfying.
Fixing a leaky tap, making simple wall mounts for unusual artwork or painting your front door are all easy undertakings. Best part? All can be done in one weekend! Wear your DIY hat and plan your next home improvement project.
Painting

With the right guidance and adequate tools, painting is one of the top DIY home projects you can tackle over a weekend. Whether it’s sprucing up a worn-out interior door or giving an entire room a refresh with a new color, painting is a task that can significantly transform the aesthetic appeal of your home.
Choosing the Right Paint Color and Supplies
Selecting the perfect paint color for your room could be a conundrum, particularly with numerous color palettes available in the market. Don’t rush. Take your time to decide on a color that best fits your room’s interior design and your personal style. Experiment with different shades by trying out paint samples.
Regarding supplies, a high-quality paintbrush, roller (if painting a large surface area), masking tape, drop cloth to protect your floor and furniture, and your chosen paint…you’re all set!
Step-by-Step Guide on Painting a Room
Since you’re ready to become a weekend warrior, let’s break down the painting process into manageable steps.
Step 1: Clear the room or, for larger items, cover them with a drop cloth.
Step 2: Use the masking tape to protect the areas you don’t want to paint, such as baseboards and door frames.
Step 3: Use a brush to “cut in” or outline the room’s edges, and then use a roller to fill in the rest of the wall.
Step 4: Allow the paint to dry entirely, ideally overnight. If needed, apply a second coat.
Step 5: Once dried, carefully remove the masking tape.
Et voila! You just mastered the art of DIY painting, successfully delivering a vibrant transformation to your room. Remember, your level of patience can impact the painting outcome, so take your time, and enjoy the process!
Hanging Shelves
Types of shelves and their uses
Decorating your home doesn’t have to be expensive or time-consuming. Installing hanging shelves is a weekend enhancement. In addition to providing elegance, they increase storage space.
Your demands and preferences determine the style of hanging shelf you choose. The sleek, modern style of floating shelves is appealing. They exhibit ornamental goods, books, and plants well. Corner shelves, however, maximise corner space. Most rooms look good with ladder shelves’ rustic look.
Installing and styling floating shelves
You’re probably wondering how complicated it is to install floating shelves, right? But with the right tools and directions, you got this! Here’s a simplified guide:
Step 1: Decide on the placement of the shelves.
Step 2: Use a level and pencil to mark the exact location on your wall.
Step 3: Drill holes where you marked, insert wall plugs, and then screw the brackets into the wall.
Step 4: Attach the shelf to the brackets. Ensure it’s secure.
Voila! Now, it’s time to style your new shelves. Keep it clutter-free. You might want to group similar items or plan a color scheme for a harmonious and aesthetically pleasing look. Display books, vases, or small artworks. Don’t forget to step back and see the overall effect. Make adjustments as needed. Remember, it’s your home; there’s no right or wrong way to style it! Enjoy your weekend DIY project and the refreshing change it brings to your home.
Installing a New Faucet
A new faucet can dramatically change the aesthetic of your kitchen or bathroom. It is one of those weekend DIY projects that don’t require much time or expertise, yet brings a significant improvement to your space. Upgrading your faucet not only gives your space a fresh look but can also increase functionality with new features such as touchless operation or a pull-out sprayer.
Types of Faucets and Their Features
There is a wide range of faucet styles available on the market, catering to various needs and decorative preferences. Single-handle faucets are easy to operate and suitable for kitchens where you often find yourself with only one free hand. Two-handle faucets, on the other hand, allow you to mix hot and cold water to your preference. Touchless faucets are popular for their user-friendliness and hygiene benefits.
Step-by-step guide on replacing a faucet
Replacing your old faucet with a new one might seem like a daunting task, but it’s a project you can master quickly.
Step 1: Start by turning off your water supply. Next, disconnect your supply lines from your old faucet.
Step 2: Remove the old faucet. It’s a good idea to take a photo of the faucet arrangement before you begin, to help you during installation of the new one.
Step 3: Install the new faucet according to the manufacturer’s instructions. It would typically require you to put the gasket over the faucet holes from top and hold the faucet in place.
Step 4: From underneath, tighten the nuts to hold the faucet secure. Then reconnect the supply lines.
And there you have it! Your beautiful and more functional new faucet is ready to use. Remember, home improvements don’t have to be a massive undertaking – start small and aim for projects that are manageable yet fulfilling.
Creating a Gallery Wall
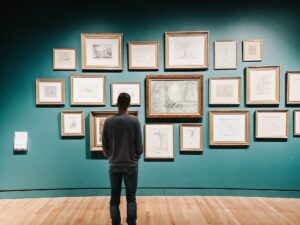
A weekend at home can be the perfect time to spruce up your living space. If you’ve got a bare wall screaming for attention, why not transform it into a stunning gallery wall? This is a great DIY project that can immensely improve the aesthetic of your home, and guess what, you can accomplish it within a weekend!
Tips on Selecting and Arranging Wall Art
You need to plan and buy the correct wall art for this project. Try a mix of photos, paintings, and mirrors that complement your style and personality.
Choose complementary sizes, shapes, and colours. Gallery walls are meant to tell a story, thus cohesiveness is essential. To balance and add visual interest, use larger pieces in the centre and surround them with smaller pieces.
Step-by-Step Guide on Creating a Gallery Wall
Step 1: Gather your chosen art pieces and make a plan. Sketch your layout on a sheet of paper, or better yet, arrange them on the floor for a visual representation.
Step 2: Next, take measurements of the wall and the frames to gauge where each piece will go. Remember, spacing is crucial; you don’t want your pieces to be too close together or too far apart.
Step 3: Now, it’s time to start hanging. Start with the piece in the center and work your way out. Adjust as necessary until you’re satisfied with the overall look.
Step 4: Take a step back, admire your work and enjoy your new beautiful gallery wall! Don’t forget to share the results of your weekend DIY project with friends and family.
Embrace your creative side and add personality to your home with this engaging weekend project!
Building a Bookshelf
Need another fun weekend DIY project? Build your own bookshelf? It adds flair and personality to your room while adding storage. DIY beginners don’t worry! We have a fun, easy assignment for you.
Materials and Tools Needed for Building a Bookshelf
Before rolling up your sleeves, let’s gather all the essential materials and tools. You’ll need some sturdy wood (plywood or pine would work great), wood screws, sandpaper, a saw, a drill, a level, and wood paint or stain for finishing.
Step-by-Step Guide on Building a Simple Bookshelf
Step 1: Start with measuring and marking the pieces of wood for both sides, the top, bottom and shelves.
Step 2: Using your saw, carefully cut along the marked lines. Sand the edges to make them smooth.
Step 3: Now, it’s time to assemble the bookshelf. Start by attaching the top and bottom pieces to the side pieces using your drill and wood screws.
Step 4: Next, attach your shelves. Use your level to be sure they’re straight before securing them.
Step 5: Once your structure is complete, sand the entire thing for a smooth finish. Wipe off any dust before applying your chosen finish.
Step 5: Let your new creation dry before placing it in its new home!
Remember, the key to any successful DIY project is patience, so don’t rush. Take your time, enjoy the process, and be proud of what you’ve accomplished!
Installing a Ceiling Fan
A home improvement project well within your reach is installing a ceiling fan. A fan will not only cool you down during those unbearably hot summer days but also help reduce your energy bill. By circulating warm air during winter, ceiling fans can help you ease up on the thermostat. So, you’ll be doing a solid for your wallet and the planet! Let’s dive into the different types of ceiling fans and how to install one.
Types of Ceiling Fans and Their Features
When it comes to ceiling fans, you have several options, each with its unique features. Here’s a look at the most popular ones:
- Standard Ceiling Fans: These are the most common types of ceiling fans, and they can be installed with or without a light fixture. They come in a wide variety of styles to match just about any decor.
- Energy Star Ceiling Fans: These fans are up to 60% more energy-efficient than standard models and can significantly reduce your cooling expenses.
- Low Profile Ceiling Fans: Also known as hugger fans or flush mount fans, these are ideal for rooms with low ceilings since they mount directly to the ceiling.
Step-by-step guide on Installing a Ceiling Fan
Before starting the installation, make sure you have easy access to the circuit breakers or fuse box, as safety is always paramount. Here’s how you get a fan up and running:
Step 1: Begin by turning off power at the circuit breaker.
Step 2: Assemble your new ceiling fan following the manufacturer’s instructions.
Step 3: Next, remove the existing light fixture or fan.
Step 4: Now is the time to install the mounting bracket and electrical box, then connect the wiring.
Step 5: Attach the fan blades to the motor, then mount your fan and connect the wires.
Remember to always consult with a professional if you’re unsure at any stage. Yet, another win for the DIY beginner! What’s up for next weekend?
Adding Cabinet Hardware
Investing a significant amount of money in the services of a professional interior decorator or on high-priced furnishings is not required in order to get an improved aesthetic in your home. It is possible to achieve major changes with relatively little renovations, such as installing new cabinet hardware.
It is a do-it-yourself project that is simple, satisfying, and can be completed in a single weekend. Not only will it have a huge impact on the appearance of your kitchen or bathroom, but it also gives you the opportunity to express your own unique sense of style.
Choosing the Right Hardware for Cabinets
You must first select the appropriate hardware for your cabinets before you can move on with this project. Knobs and pulls for cabinets can be found in a wide variety of designs, forms, colours, and finishes.
You have the option of selecting handles that are sleek and stylish for a modern kitchen or knobs that have a rustic appearance for the beauty of a country kitchen. Make sure the hardware you choose fits in with the style of the rest of your room as well as your own individual preferences.
It is also essential to ensure that the door hardware is in appropriate proportion to the door panels. It’s possible that knobs or pulls that are too little will look out of place on huge drawer fronts, and vice versa. Take this into consideration when making your choices.
Step-by-Step Guide on Installing Cabinet Knobs and Pulls
- Measure: Start by marking where you want the knobs or pulls to go. Use a template to ensure the handles are placed consistently on every door and drawer.
- Drilling: Once you have your spots marked, use a high-speed steel drill bit to create holes for the screws.
- Installation: Push the screw through the hole from the inside of the cabinet and then thread on the knob or pull.
- Finalise: Make sure all the knobs and handles are tightened properly and sit flush against the cabinet door or drawer front.
Take pride in this personalized, low-cost enhancement to your home. What DIY project will you take up next?
Conclusion
After successfully enhancing your cabinet hardware, you may be pondering about other do-it-yourself (DIY) projects. Simple, effective, budget-friendly, and manageable in a weekend, these projects not only transform your space but also give you a sense of accomplishment.
Benefits of DIY Home Improvement Projects
1. Cost-effectiveness: DIY projects generally are less expensive than hiring professionals. You pay only for materials, cutting out labor costs.
2. Personal Satisfaction: There’s an incomparable sense of accomplishment in undertaking a project by yourself, seeing it through to completion, and revelling in the result.
3. Customizability: With DIY, you have full creative control over your projects, allowing you to adapt them to match your style and specifications.
Inspiration and Resources for Future Projects
1. Painting Rooms: Consider changing the color scheme of your rooms. With careful planning and the right tools, this could be a manageable weekend project.
2. Upcycling Furniture: With a little creativity, old furniture can be upcycled into fascinating new pieces. You could paint an old chair, turned it into a planter, or refinish a vintage table.
3. Creating a Gallery Wall: Show off your stylish side by decorating a wall with photos, artworks, hangings. It’s a great way to personalize your space and display things that reflect your personality.
There are many internet resources to inspire projects for your skill level and style. You’re almost a DIY pro. Every project you finish builds confidence and skills for more complicated projects. DIY home improvement should be exciting, exploratory, and experimental.

I’m James Brown, the founder and editor of DIYINUSE.COM. I have over 15 years of hands-on woodworking and DIY experience that I share through tips and project inspiration on my website. When I’m not working on home improvement projects or creating content for the site, I enjoy spending time outdoors hiking and fishing. I’m always looking to expand my creativity and DIY skills by learning new techniques.